

It's no secret that calling your leads is one of the most effective ways to convert a prospect into a sale, but did you know that according to a study in 2024, 50% of sales occur after the 5th contact? Unfortunately, most sales agents give up after just 2-4 attempts. Here at Wise Agent, we know the secret to success is persistence and that's why we're committed to partnering with the solutions that offer you the ability to set yourself up for success.
WAVV is a Power Dialer system that provides you with the ability to call your leads directly from your Wise Agent CRM. Now you have the option to call your leads and document the results of your conversation all in one place. With options to drop pre-recorded voicemails, review your recorded calls for up to 30 days and even access a comprehensive reporting dashboard with metrics on your usage statistics you'll be more productive than ever. Connecting to your leads has never been easier in the Wise Agent dashboard!
If you're ready to take advantage of this new feature you'll find all the details you need below!
Let's get started!
Before you can start dialing, there are a few things you'll need to do to set up your WAVV Power Dialer. Follow the instructions below to learn how to choose from three packages available to you within the Wise Agent CRM and set up your settings so you can start your dialing campaign as soon as possible. For a video tutorial on how to set up your WAVV Power Dialer, you can click here.
ACTIVATING YOUR NEW WAVV SUBSCRIPTION & CONFIGURING YOUR SETTINGS
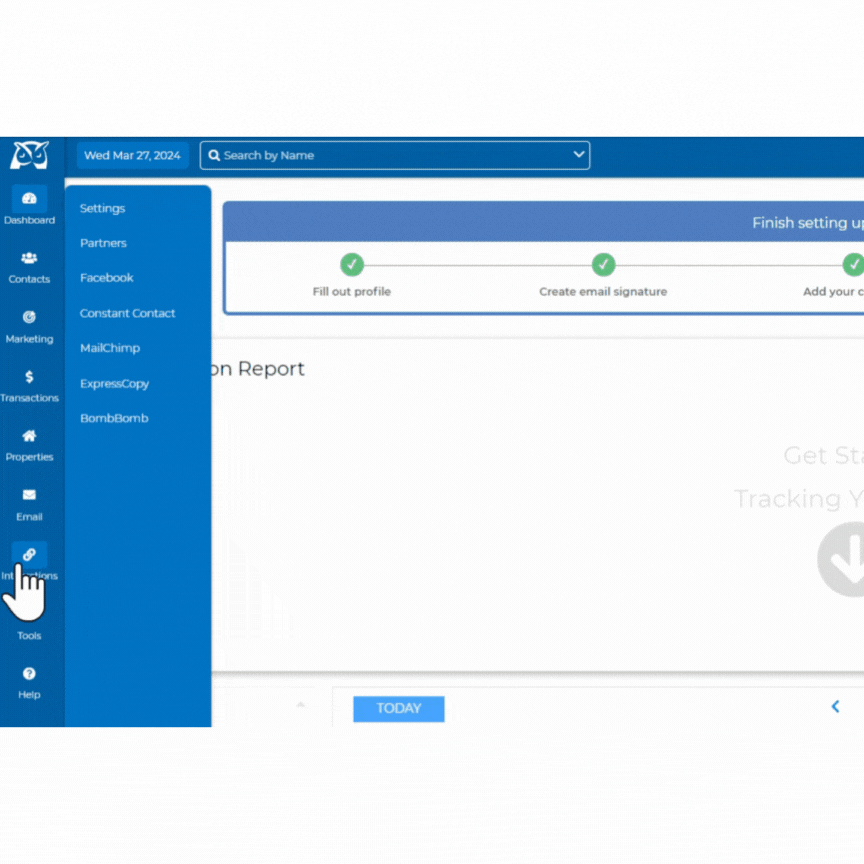
- Log into your Wise Agent CRM and click the Integrations tab from your navigation pane to the left. Click Settings.
- Click the Built-in Power Dialer by WAVV option to access the options to configure your new integration.
- Click the Activate button to view the WAVV subscription options.
- Click the blue Select button under the subscription option of your choice. You will be prompted to confirm that you are sure you would like to update your monthly billing cycle in Wise Agent to include the WAVV subscription. Click YES.
PLEASE NOTE: The WAVV Dialer can only be used by one individual at a time per subscription. This means that if you have multiple team members that would like to use the dialer you will need to purchase each user their own subscription and assign the subscription to their Wise Agent account.

That's it! Once your payment has settled you will receive an email letting you know your payment has been successfully processed and you can begin configuring your WAVV Dialer settings. These settings MUST be configured before you make your first call to ensure that you are prepared whether your contacts answer the phone, or not.
CONFIGURING YOUR WAVV DIALER SETTINGS
In order to use your WAVV Dialer you will need to ensure that your settings are configured to ensure that you are prepared for any outcome of your calls. Follow the steps below for details on how to ensure your WAVV Dialer is ready for use. You can also adjust your settings at any time if your preferences ever change. We've broken down the settings section for you based on our recommended settings, but for a more in-depth explanation of each setting option, click HERE.
- Click on Integrations and then click Settings. Then click Built-in Power Dialer by WAVV.
- Click the settings cogwheel next to Manage Subscriptions to open your WAVV settings.
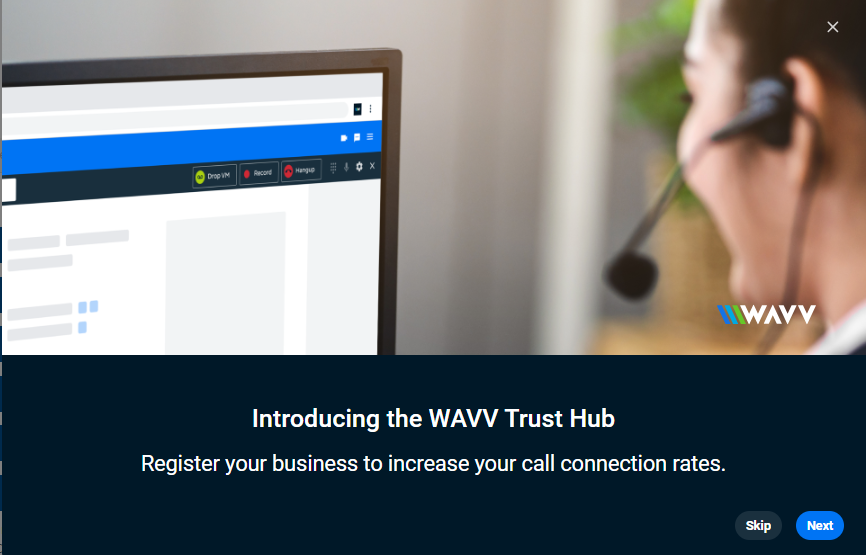
TRUST HUB: STIR/SHAKEN REGISTRATION
- You will be automatically prompted to complete the Trust Hub settings to register your business through WAVV. Click here for more details on what STIR/SHAKEN is and why it's recommended that you complete this registration. You can choose to SKIP this registration and you will always have the option to register by selecting the TRUST HUB option within your settings. PLEASE NOTE: Currently only users that have a valid EIN have the option to register. Click Next to begin the registration. If you do not have an EIN click SKIP and proceed to step 6.
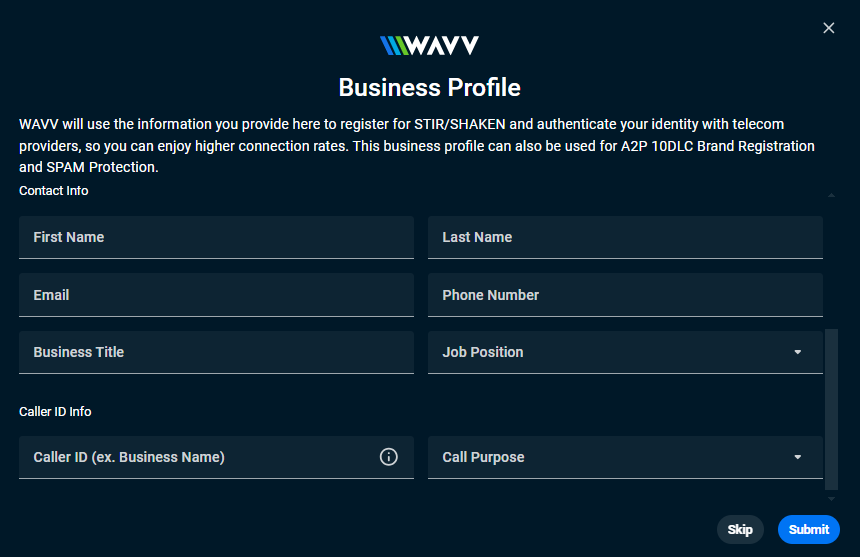
- Complete your business profile.
TIP: Be sure to include accurate information to ensure that your registration is accepted. For example, you must input your business details exactly as it is shown on your tax documentation, if your business is listed as Wise Agent LLC on your tax forms you cannot register as simply Wise Agent, you must include the full business name in it's entirety.
You must also ensure that the business address listed on your tax documentation matches as well. - Click the Submit button to submit your registration.
ADDING YOUR PHONE NUMBERS
- Click on Phone Numbers option on the left hand section of your settings to add a new phone number. This must be done before you are able to set up any dialing campaigns.
- Click Add Personal Number and type in your personal phone number. (This must be a valid phone number that has the ability to receive SMS text messages and phone calls.) Then click Call or Text. WAVV will either call you or send you an SMS text message with a 5-digit verification code that you must enter in order to validate your phone number. You can add as many phone numbers as you would like to this section.
- Now that your phone number has been verified, you can click the pencil icon to give your new number a Nickname, which is recommended if you plan to use more than one phone number.
- Next you'll need to claim a WAVV number. Click Claim WAVV Number and enter in your preferred area code. Then click Claim Number.
- Once your WAVV Number has been selected you click the drop down in the CALL FORWARDING column and select your verified number. This way, if you choose to use your WAVV number as your outgoing caller ID and a client returns your call, the call is forwarded to a working number.
GENERAL SETTING RECOMMENDATIONS
NOTE: The setting instructions below are the recommended settings by Wise Agent. For a more in-depth description of all the setting features and options offered by WAVV you can click here. - Click on the General Settings tab to access your WAVV Dialer settings.
- In the Your Phone Number section select the number you would like to use as the number that WAVV uses to initiate a dialing campaign.
- Select the phone number you would like to have displayed as your outward facing caller ID in the Caller ID Number section. (This is the number that your call recipients will see when you call them. You can choose to use your WAVV number or your personal phone number.)
- Add your preferred Caller ID Name. (This is the name that will be displayed on your recipient caller's caller ID when they receive your call. If you DO NOT complete the Business Profile Trust Hub section of the settings Wise Agent cannot guarantee that phone providers will honor your Caller ID Name selection.)
- Select how many dialing lines you would like to use per call. (This option is only available to users who have opted to use the Multi-Line Dialer plan.)
- Select between 5-10 under the Ring Timeout pulldown. (This option dictates how long the dial will allow the call to ring before moving on to the next call.
- Toggle on the Time zone Protection and indicate your preferred timeframe. This prevents the system from calling anyone that might be in a different time zone outside of the indicated hours you've selected.
- Click Audio Source on the settings menu and select which method you would like to use as a default when making dials with WAVV Dialer. You can choose to have WAVV Dialer call any of your verified phone numbers, use computer audio, or dial into the WAVV Dialer.
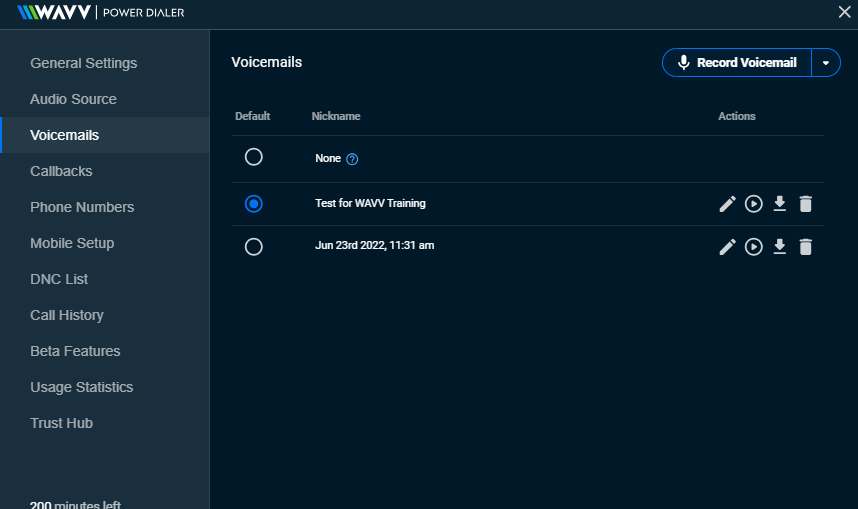
CREATE VOICEMAILS AND CALLBACK MESSAGES
- Click the VOICEMAIL tab from the settings menu.
NOTE: You can access more in-depth instructions on how to create voicemails and call back messages by clicking here. - Click Record New Voicemail and select which method you would like to use to record your message. You can upload a pre-recorded file, use your computer's microphone or your mobile device to record a message.
- Once you're message has been recorded, select the recording you would like to use as a default when making dials.
- If you are using the Multi-Line Dialer plan and have opted to call more than one contact at a time, click CALLBACKS to record your callback message. If you do not have the Multi-Line Dialer plan, move on to the next step. The process to record a callback message is the same as recording or uploading a voicemail. Once you've recorded or uploaded your call back message select your default callback recording to use during calls.
SELECT YOUR DEFAULT AUDIO SOURCE
- Now that you've gotten your pre-recorded voicemails and callback messages set up, the last setting to make sure you have set up is your Default Audio Source. This tells the Wise Agent Built-in Power Dialer which method to use to connect you to the dialer. You can choose between three options:
Computer Audio: This option will run your dialer campaigns through your computer, either using your PC's default speakers/microphone or a USB/Bluetooth Headset. You will need to enable permission on your browser to use the microphone and you must click allow to enable this feature. (Google Chrome, Mozilla Firefox, Microsoft Edge and Safari are the recommended and supported browsers when using this selection.)
Call me at (XXX)XXX-XXXX: This option will start the dialing campaign by calling the phone number you've selected. Once you click Dial and the call begins, you will receive a phone call on the number selected and the campaign will remain on your phone number for the duration o your campaign.
Dial in to WAVV: This option will require that you manually dial into the WAVV dialer when you wish to begin your campaign. Once you click DIAL, you will receive a pop up within the Wise Agent CRM with a phone number and PIN. You will need to dial the number listed and enter in the PIN to access your dialer campaign.
The first option is to use Computer Audio, next is to have the WAVV Dialer call you at one of your verified phone numbers, and lastly you can choose to dial into the WAVV Dialer.


Now that your default settings have been created you are ready to start making dials. Click here for information on how to create a dialing campaign using your new WAVV Dialer.
If you need assistance with setting up your WAVV Dialer please don't hesitate to reach out to the Wise Agent support team by clicking on the Contact Us button or call our office at 480-836-0345. Our amazing support is always happy to help and is available 24/7!