

A Transaction Portal is created from an active real estate transaction checklist in your Wise Agent account and is accessible to everyone involved in that transaction. This portal shows an itemized list of what is complete in that real estate transaction and what still needs to happen. When your real estate clients need an update on the progress, instead of calling you, they can simply log in with the login credentials you share with them and have access to the progress you have made.
These portals are easy to create, completely customizable, and don’t require any software download. Build them directly in your Wise Agent account and create templates to build future portals even quicker. Include branding from your Wise Agent account, or create new branding for your portal!
Creating Your Portal Theme
- From the sidebar, select Transactions ➔ Transaction Portals.
- Once on the Transaction Portal page, select the tab labeled Transaction Portal Themes.
- You can choose from our theme templates or copy an existing email signature by selecting the Email Signatures drop-down menu. Additionally, you can choose a menu color to align with your chosen branding.
- Once you click Save, you'll be all set to proceed to the transaction portal manager!


Opening Your Transaction Portal
- From the sidebar, select Transactions ➔ Transaction Portals.
- Once on the Transaction Portal page, select the ➕ to the right of Managing
- Next, select your transaction checklist from the New Portal Checklist pop-up drop-down menu, then click Select.
- Under the Portal Settings, you can update the Portal Name, Menu Label, Portal Theme, Welcome Message, and Property information if you wish to do so.
- To edit the viewing permissions, enabling and disabling sections of your checklist the client can and cannot view within the portal, click on Edit Permissions.


Adding Your Client(s) To Your Transaction Portal
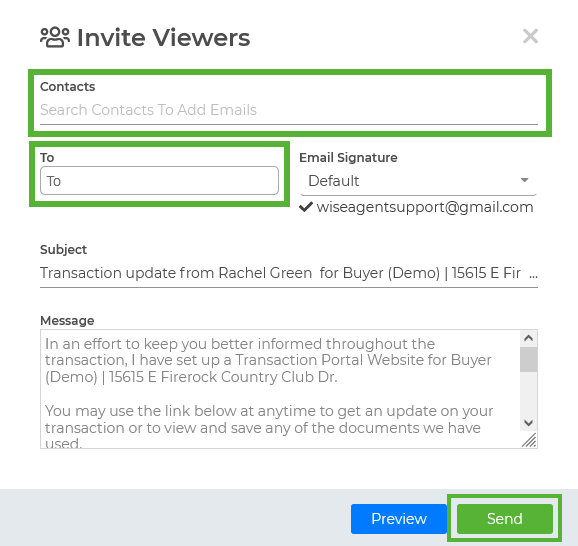
- Once you are ready to add your client, you can do so by clicking the ➕ to the right of Viewers.
- Once selected, you can search for your client by typing their name under Contacts, or adding a new email under To. Once added, click Send.
- Once sent, your client will receive an email! Within the email, your client can click View Transaction Status to open their portal, where they will create their unique login. Once their login is set up, they can log in anytime to view the portal!


Using Transaction Portal Join Code and Adding Collaborators:
In addition to sharing portals with your clients, you can also collaborate with other Wise Agent users by inviting them to join your transaction portal using a Join Code.
Collaborators are typically other agents or transaction coordinators within your brokerage or team who need visibility into the same transaction. By using the join code, they can connect their own checklist to the same portal page, allowing for aligned timelines and better coordination.
⚠️ Note: Collaborators cannot add notes to the original checklist through the portal. To make edits, add notes, or upload documents to a specific member’s checklist, they must have access to that member’s Wise Agent account.
How to Share the Join Code with Collaborators:
-
Go to Transactions ➔ Transaction Portals.
-
Under the "Managing" section, click on the name of the portal.
-
In the banner at the top, click on Portal Settings.
-
On the far right, you’ll see the Join Code.
-
You can:
-
Copy and share the code manually, or
-
Click the ellipsis icon (...), select Invite Collaborators, and enter the email address of the Wise Agent member you want to invite.
-
-
The invitee must be an active Wise Agent user to join as a collaborator.

How Collaborators Join:
Once invited, the collaborating agent will:
-
Log in to their Wise Agent account.
-
Go to Transactions ➔ Transaction Portals.
-
Use the Join Code in one of two ways:
-
Watch: If they only want visibility into your checklist, they can enter the code in the Watch section.
-
Join: If they want to attach their own checklist to your portal, they’ll use the code in the Join section. After clicking the ➕ icon, they’ll be prompted to select one of their checklists to connect.
-

Once connected, the portal will display tabs for each agent’s checklist, allowing all collaborators to view updates in real time.

How to View or Remove Joined Checklists from a Portal
-
Navigate to Transactions ➔ Transaction Portals.
-
Under the Managing section, click on the name of the portal you’d like to manage.
-
On the Transaction Portal Manager screen, scroll down to the Checklist section.
Here, you’ll see a list of all checklists currently attached to the portal:
-
A key icon next to a checklist name indicates the primary checklist that the portal was originally created from.
-
A red trash can icon next to each checklist allows you to remove that checklist from the portal. This will disconnect it from the portal page, but will not delete the checklist itself from your account.
Use this section to manage which checklists appear on your shared portal, ensuring only relevant or active ones are visible to collaborators and clients.

The Portal Webpage feature is especially helpful for compliance teams, brokers, or transaction coordinators who want centralized visibility while maintaining secure access to individual accounts.
To learn more about the Transaction Portal Feature, you can visit our blog or contact our 24/7 support team for further assistance.