Activating The Integration
- Log in to your Wise Agent account.
- From the sidebar, select Integrations, then Settings.
- Locate and select Constant Contact, then select Activate or Sign-up. This will then open a tab where you can allow Wise Agent to access your Constant Contact.
Utilizing The Integration
Once integrated, to begin utilizing the integration, select Integrations from the sidebar, then Constant Contact. Below are steps highlighting the options on the Constant Contact page:
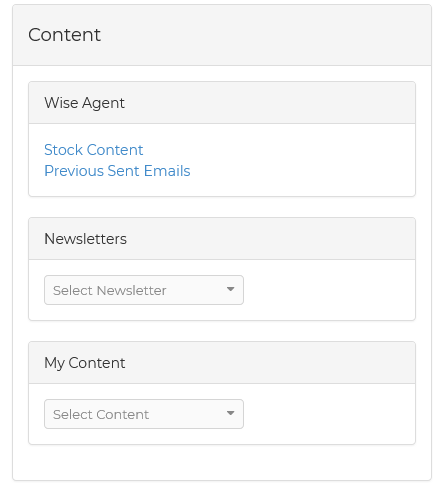
First, you can access various content options from the left-hand menu or create a new email campaign
- Stock Content: Explore customizable templates for different occasions, including buyer and seller themes, holidays, and more.
- Previous Sent Emails: Review and utilize past emails. Edit them as needed and select recipients.
- Newsletters: Send newsletters created in Wise Agent by selecting them from the dropdown menu.
- My Content: Access saved letter/email content from your Content Library.
Next, you can manage your Constant Contact Lists and Campaigns using the tabs at the top of the page:
The Accounts Tab
View connected accounts and add or delete them as needed in the Accounts tab.
The Email Lists Tab
Easily import Constant Contact email lists into your Wise Agent contact list using the import button next to each list.
The Campaigns Tab
View and manage all created campaigns & schedule campaigns for specific lists by setting date and time preferences under the Schedule option.
The New Campaigns Tab
Start by selecting your branding and clicking the "use this" button, you may skip that part if you like. Then select the yellow [[message]] placeholder. On the left will be a series of links for content, click the Email Articles link. Select a category, then click on your selection. It should replace the yellow [[message]] placeholder tag. Proofread and spell-check your content then click the "Save Campaign" button. Constant Contact will add its headers and footers to your content and save your campaign.
Adding A Single Contact to Constant Contact
- From the sidebar, select Contacts then Contact List.
- Search for the desired contact and click on their name to view their Contact Summary.
- On the left-hand menu, select Constant Contact and click the green plus icon to add the contact to a list.
Adding Multiple to Constant Contact
- From the sidebar, select Contacts then Contact List.
- From your contacts list, select the checkbox next to the names of contacts you wish to add.
- From the Actions dropdown at the top of your contact list, select Integrations option > add to Constant Contact
- Confirm the selected contacts and choose whether to create a new list or add them to an existing one.
- Click Add to complete the process.


